Requirements for accessing the API
- A BrandMail Account
- A valid API Key.
- A Standards Compliant JSON-RPC library
- Network access over port 80, or port 443 for SSL.
Please contact your System Administrator if you are unsure as to whether you conform to these requirements.
The API connection string which would typically be used is:
http://www.Brandmail.com.au/api/jsonrpcserver.php?version=3.0
- If a Virtual Host is setup (which Resellers and some Corporate clients use), "www.Brandmail.com.au" would be replaced with the Virtual Host URL, eg: "yourproductname.yourcompanydomain.com.au"
- If the Virtual Host is SSL enabled, then the "https" scheme could be used instead of "http"
- 3.0 reflects the API version being used. At this point in time 3.0 is the most recently officially released version.
Steps for Getting Started
Get Access to a live Account
You may need to contact the owner of a live BrandMail account that you are planning on developing for. They can then provide you with a Username and Password to access this account by setting you up with a user account.
Once this has been completed, you can then login and obtain relevant API key information.
Need to get an account?
Sign up for a free BrandMail account here. This free account will have full access to the API where you can test and build a live integration
Confirm that your system has the API package and network access over port 80 (port 443 for SSL).
Download a JSON-RPC library.
The API can use any JSON-RPC library.
For your convenience, the example code in this document appears in both PHP and JSON-RPC. You may want to browse through some of the many implementations available online for download before selecting one.
Generate an API Key so you can access the API.
To generate an API Key:
- Log in to the system.
The initial screen is the Dashboard. - Click the Account link in the upper right corner of the screen.
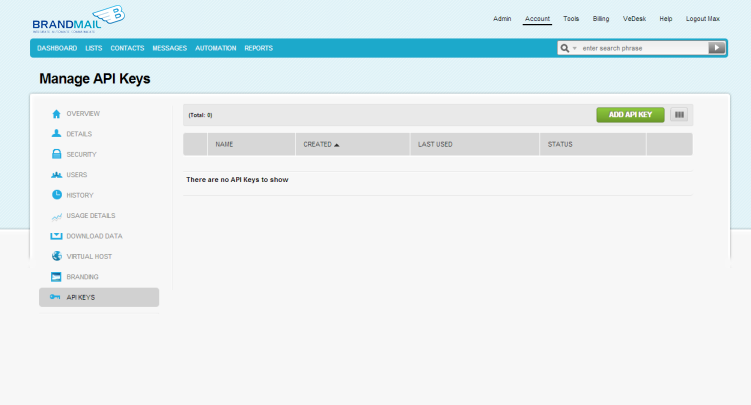
The screen displays the Account Overview page. - At the bottom of the Left column, click API KEYS.
The screen displays the Manage API Keys page. If this is the first time you are generating an API Key, the message There are no API Keys to show appears.

You can create multiple API Keys on the Manage API Keys page and give a different API Key to each API User. - Click

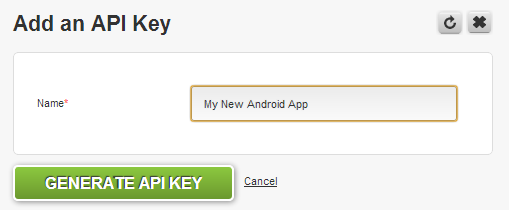
The Add an API Key dialogue box pops up.

- Enter a name for the API Key.
The name is for display purposes only. We recommend naming the key after its function, and, if it is being generated for a specific person, including the person's name in the key name. - Click

The dialogue box now displays your API Key with the message This is a one time key only. Make sure you save this key in a secure location.

- After you copy and save the API Key, close the API Key Dialogue Box.
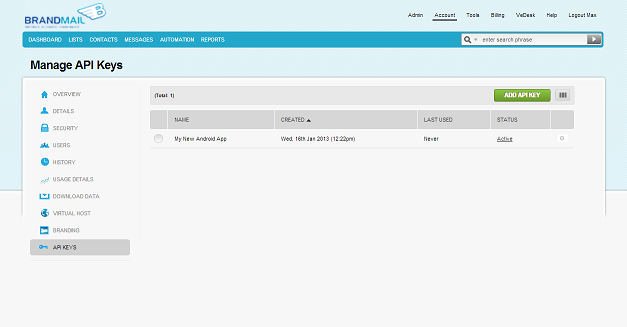
The new API Key is now listed on the Manage API Keys page.

When calling API methods, supply the API key as the first parameter.
- Log in to the system.
Next Steps
Review and try out the Common Use Cases. If the use cases would add functionality to your system, adapt them so you can use them regularly.
Review the Basic Structure of the API
Learn about Optimising API Performance
Continue to the Method Reference Guide

